How To Add Custom Robot.Txt In Blogger (Blogspot Blog)

For better SEO performance of our blog, We have to advance Robots.txt for better SEO (Search Engine Optimization). Robots.txt tells the search engines crawlers about what pages to crawl and what not to. In blogger (blogspot blog) we have an option to customize the robots.txt file according to our requirements. Before adding it to to your blog, You need to know about it and how it works. So lets begin.

What is Robots.txt

Robots.txt is a file which help to inform the search engine crawlers what page to crawl and what not to.  All Search engine crawlers scan the robots.txt file before crawling any blog. So lets start adding Robots.txt to improve SEO visibility of your blog.

Adding Robot.txt to Blogspot Blogs:

Follow the following steps mentioned below to add Custom robot.txt yto your blogspot blog.
1. Visit to your Blogger blog
2. Go to Settings>> Search Preference 
How To Add Custom Robot.Txt In Blogger (Blogspot Blog)

3. Crawlers and indexing>>Custom Robots.txt>>Edit>>Yes
4.  Paste the below robot.txt file code in the box.

User-agent: Mediapartners-Google 
Disallow: 

User-agent: * 
Disallow: /search 
Allow: / 

Sitemap: https://example.blogspot.com/feeds/posts/default?orderby=UPDATED

5. Change the highlighted url example.blogspot.com  with your blog address.
6. Click on Save Changes button. You are all Done.
How To Add Custom Robot.Txt In Blogger (Blogspot Blog)

Conclusion: I hope this article is helpful to Add Custom Robot.Txt In Blogger (Blogspot Blog), Share it or Leave a comment below.

How to Add Adsense Ads to Blogger blogspot blog

How to Add Adsense Ads to Blogger

Google Adsense is the number one best and largest online advertising network in the World. Its free and offer the opportunity to website(blog) owner to earn money by placing Ads on their blog or website. Adsense will shows targeted Google ads in your blog(website). Also Adsense offers the highest CPM rates that you can easily earn more money quickly even for less traffic.You will get payment  a month after reach the threshold which is $100. You can get your  payment by transferred through the Western Union, or you can use wired transfer. Here I have listed step by step process that you can use to add Adsense to your blog.

Add Adsense Advertisement to Blogger blogspot blog

1. Adsense Blogger Gadgets

Follow the below steps to add Adsense Ads by Blogger layout.

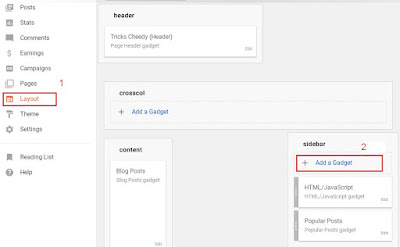
i) Login to Blogger account then go to Layout and click on Add a Gadget link as sown on screenshot below.

Add Adsense Ads to Blogger

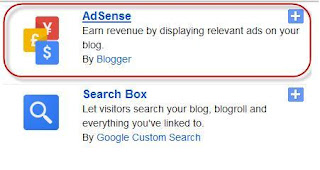
ii) Pop-up window will be opened after click on Add a Gadget as shown on screenshot below.

Add Adsense Ads to Blogger blogspot blog

iii) Configure ad format that you wish to display it on your blog
iv) After configure ad format, Then click on save button and you are done.

Conclusion: I hope this article is helpful to Add Adsense Ads to Blogger blogspot blog, Share it or Leave a comment below.
How to Turn Off Autoplay Videos On Facebook

Turn Off Autoplay Videos on Facebook

I have prepared this article for those who are being disturbed and want to turn off autoplay videos on Facebook. Remember that Facebook turn this setting on by default. But you can turn off this feature less than a minute on Facebook apps and Computer. Follow the below steps to disable autoplay videos on Facebook.

Desktop(Computer)
First, Login to your  Facebook account (that you wish to disable Autoplay videos) and Click on downward caret icon in the upper right hand corner of the home screen. And select "Settings" then choose "Videos" from the menu on the far left, then change the setting for "Auto-Play Videos" to "Off".

off autoplay videos on Facebook

Mobile (iOS)

Open Facebook's iOS app, At the top select the icon of three lines in the lower right corner, then Settings>>Account Settings>>Videos and Photos>>Autoplay, and finally select "Never Auto-play Videos". You are done!.

Mobile (Android) 

Open Facebook's Android app, At the top select the icon of three lines in the lower right corner, then Settings>>App Settings>>Autoplay-play, and finally select "Never Auto-play Videos". You are done!.


Conclusion: I hope this article is helpful to  Turn Off Autoplay Videos On Facebook, Make sure you share it through all social networks or Leave a Comment below.

How to Add Contact US Form in blogger

How to Add Contact US Form in blogger 

Contact Form Widget its official version launched by Blogger. But, this contact form works only on the Blogger Sidebar. So that, if you searched many times to find out how to set up a Contact US or Contact Me form on your blog?. Do not worry, this article will lead you easily to Add Contact US Form in blogger.  As you know Contact form is very important for any blogger to have. There are two methods that can be used to Add Contact US Form in blogger. 

Add Contact Form Widget for Blogger Sidebar 

Remember that this works only on the Blogger sidebar. Lets go!
  1. Login into your blogger dashboard(that you wish to add contact us form) and Go to Layout
  2. Click on add gadgets
  3. Choose More gadgets from the left side
  4. Now, View your blog you will see Contact Form. Just add the same as below screenshot.You are done. but if you want Contact Form to appear on separated page proceed with another steps below
Add Contact US Form in blogger


Hide Contact form in Sidebar

  1.  Go to your template to hide this contact form and move it to separated page.
  2. Click on Theme>>Edit Html
  3. Search for ]]></b:skin> and Then,add below code just before above code
div#ContactForm1 {
display: none !important;
}


Adding Contact Form to Separated Page

  1. Go to Pages and Create a new Page.
       
       2. Paste below Code into the HTML post editor

<div id=”custom_ContactForm1″ class=”widget ContactForm”>
<div class=”contact-form-widget”>
<p>Get in touch with us by filling out the form below.</p>
<div class=”form”>
<form name=”contact-form”>
<p></p>
Name
<br>
<input type=”text” value=”” size=”30″ name=”name” id=”ContactForm1_contact-form-name” class=”contact-form-name”>
<p></p>
Email
<span style=”font-weight: bolder;”>*</span>
<br>
<input type=”text” value=”” size=”30″ name=”email” id=”ContactForm1_contact-form-email” class=”contact-form-email”>
<p></p>
Message
<span style=”font-weight: bolder;”>*</span>
<br>
<textarea rows=”5″ name=”email-message” id=”ContactForm1_contact-form-email-message” cols=”25″ class=”contact-form-email-message”></textarea>
<p></p>
<input type=”button” value=”Send” id=”ContactForm1_contact-form-submit” class=”contact-form-button contact-form-button-submit”>
<p></p>
<div style=”text-align: center; max-width: 222px; width: 100%”>
<p id=”ContactForm1_contact-form-error-message” class=”contact-form-error-message”></p>
<p id=”ContactForm1_contact-form-success-message” class=”contact-form-success-message”></p>
</div>
</form>
</div>
</div>
<div class=”clear”></div>
<span class=”widget-item-control”>
<span class=”item-control blog-admin”>
<a title=”Edit” target=”configContactForm1″ onclick=”return _WidgetManager._PopupConfig(document.getElementById(“ContactForm1″));” href=”//www.blogger.com/rearrange?blogID=8799058979810298021&widgetType=ContactForm&widgetId=ContactForm1&action=editWidget&sectionId=sidebar-right-1″ class=”quickedit”>
<img width=”18″ height=”18″ src=”//img1.blogblog.com/img/icon18_wrench_allbkg.png” alt=””>
</a>
</span>
</span>
<div class=”clear”></div>
</div>


     3. Now publish your page as contact us page. You are done.


Conclusion: If this article is useful to  Add Contact US Form in blogger , Make sure you share it through all social networks or Leave a Comment below.

How to add In-feed ad unit to blogger

When you start a blog your goals is either to earn money through Ads or do it as a passion. Google Adsense is one of the best and largest online advertising network. Its free and offer you the opportunity to earn money by placing Ads on your blog or website. But to get approved by Adsense you must follow their quality guideline. Let's go to the business how to Add Native In-feed Ads to Blogger Blogspot Blog and Improve your Earnings. Follow steps by steps below to Add Native In-feed Ads.   

add In-feed ad unit


These are Types of In-Feed Ads

  1. Image Above
  2. Image on the side
  3. Title Above
  4. Test Only
  5. In-Feed Ads Theme Selection
  6. Light Background
  7. Dark Background

How to create In-feed ad unit Adsense dashboard

  1. Login to your Adsense Account then Go to Ads Units>>> New Ad Unit
  2. Then, Select In-Feeds ads
  3. Choose the style
  4. Save your In-Feed Ad Code
  5. Lastly, Copy Code snippet

How to add In-feed ad unit to blogger

  1. Login to blogger.com then choose a blog that you want to add In-feed ad
  2. Then, Go to Theme >>> Edit HTML
  3. Search this code <b:loop values='data:posts' var='post'>
  4. Replace above code under the <b:includable id='main' var='top'> to the below code      <b:loop values='data:posts' var='post' index='x'>
  5. Now search <div class='post-outer'>
  6. Lastly, replace above code with below code
<div class='post-outer'>
<b:if cond='data:blog.pageType == &quot;index&quot;'>
<b:if cond='data:x==1'>
<div class='post'>
YOUR IN-FEED ADSENSE CODE
</div>
</b:if>
<b:if cond='data:x==3'>
<div class='post'>
YOUR IN-FEED ADSENSE CODE
</div>
</b:if>
</b:if>


Be Carefully: Remember to replace YOUR IN-FEED ADSENSE CODE to your Adsense In-feed code that you have copied from Adsense ad units.


Conclusion: But do not depends on Ads only, you can create your own product and sell it through your blog. And If this article is useful to add In-feed ad unit to blogger, Make sure you share it through all social networks or Leave a Comment below.